
Adadmin is a utility that performs a number of tasks required from maintaining and
administering an Oracle Applications instance. It performs two types of works one is performed at
the database level and other is performed at the file system level. The user is required to provides all the informations at the adadmin prompt.
To start the adadmin login to the APPL_TOP as the owner of the application file system.
..........................................................................
[applmgr@apps ~]$ adadmin
Copyright (c) 2002 Oracle Corporation
Redwood Shores, California, USA
Oracle Applications AD Administration
Version 11.5.0
NOTE: You may not use this utility for custom development
unless you have written permission from Oracle Corporation.
Your default directory is '/apps/appsappl'.
Is this the correct APPL_TOP [Yes] ?
AD Administration records your AD Administration session in a text file
you specify. Enter your AD Administration log file name or press [Return]
to accept the default file name shown in brackets.
Filename [adadmin.log] :
You can be notified by email if a failure occurs.
Do you wish to activate this feature [No] ?
Please enter the batchsize [1000] :
Please enter the name of the Oracle Applications System that this
APPL_TOP belongs to.
The Applications System name must be unique across all Oracle
Applications Systems at your site, must be from 1 to 30 characters
long, may only contain alphanumeric and underscore characters,
and must start with a letter.
Sample Applications System names are: "prod", "test", "demo" and
"Development_2".
Applications System Name [apps] : apps *
Do you currently have files used for installing or upgrading the database
installed in this APPL_TOP [YES] ? YES *
Do you currently have Java and HTML files for HTML-based functionality
installed in this APPL_TOP [YES] ? YES *
Do you currently have Oracle Applications forms files installed
in this APPL_TOP [YES] ? YES *
Do you currently have concurrent program files installed
in this APPL_TOP [YES] ? YES *
You are about to use or modify Oracle Applications product tables
in your ORACLE database 'apps'
using ORACLE executables in '/apps/appsora/8.0.6'.
Is this the correct database [Yes] ?
AD Administration needs the password for your 'SYSTEM' ORACLE schema
in order to determine your installation configuration.
Enter the password for your 'SYSTEM' ORACLE schema: manager
The ORACLE username specified below for Application Object Library
uniquely identifies your existing product group: APPLSYS
Enter the ORACLE password of Application Object Library [APPS] : apps
AD Administration is verifying your username/password.
...........................................................................
[applmgr@apps ~]$ adadmin
Copyright (c) 2002 Oracle Corporation
Redwood Shores, California, USA
Oracle Applications AD Administration
Version 11.5.0
NOTE: You may not use this utility for custom development
unless you have written permission from Oracle Corporation.
Your default directory is '/apps/appsappl'.
Is this the correct APPL_TOP [Yes] ?
AD Administration records your AD Administration session in a text file
you specify. Enter your AD Administration log file name or press [Return]
to accept the default file name shown in brackets.
Filename [adadmin.log] :
You can be notified by email if a failure occurs.
Do you wish to activate this feature [No] ?
Please enter the batchsize [1000] :
Please enter the name of the Oracle Applications System that this
APPL_TOP belongs to.
The Applications System name must be unique across all Oracle
Applications Systems at your site, must be from 1 to 30 characters
long, may only contain alphanumeric and underscore characters,
and must start with a letter.
Sample Applications System names are: "prod", "test", "demo" and
"Development_2".
Applications System Name [apps] : apps *
Do you currently have files used for installing or upgrading the database
installed in this APPL_TOP [YES] ? YES *
Do you currently have Java and HTML files for HTML-based functionality
installed in this APPL_TOP [YES] ? YES *
Do you currently have Oracle Applications forms files installed
in this APPL_TOP [YES] ? YES *
Do you currently have concurrent program files installed
in this APPL_TOP [YES] ? YES *
You are about to use or modify Oracle Applications product tables
in your ORACLE database 'apps'
using ORACLE executables in '/apps/appsora/8.0.6'.
Is this the correct database [Yes] ?
AD Administration needs the password for your 'SYSTEM' ORACLE schema
in order to determine your installation configuration.
Enter the password for your 'SYSTEM' ORACLE schema: manager
The ORACLE username specified below for Application Object Library
uniquely identifies your existing product group: APPLSYS
Enter the ORACLE password of Application Object Library [APPS] : apps
AD Administration is verifying your username/password.
...........................................................................
Once all the answers are given, the adadmin main menu appears.
In this menu there are Six main options. The first two deals with maintaining application file system
eg: re-linking the application, generating the form, regenerating the JAR files etc.
The next two deals with maintaining database objects eg: compiling and validating the schema, compiling the flexfield etc. The fifth option changes the maintenance mode, and sixth is for exist

1: Generate Applications File Menu:

1. Generate message file:
This option generates all the Oracle message files. Oracle Application uses this file to display message.This task generate message binary files (extension .msb) from Oracle Application Library tables.
2. Generating Forms files:
This options generates form files (extension .fmx) from binary forms file (extension .fmb). These files are normally located at AU_TOP, and the executable file are stored under each product directory.
3. Generate report files:
This option generates the Oracle report file (extension .rdf). You can generate report files of a specific products or you can generate reports files of all products.
4. Generate graphic files:
This option generates Oracle Graphic files (extension .ogd) from the graphic definition files.
5. Generate product JAR (Java Archive) files:
This the last option in the menu. It generates JAR files. It sings the JAR files and regenerate the product JAR files in JAVA_TOP and copies them to APPL_TOP.
2 : Maintain Application Files menu:
This menu takes care of the maintenance task required to keep your application files up-to-date.

1. Relink Application programs:
This option relinks Oracle Application programs with Oracle server libraries. This option should be use only when asked for specifically by Oracle.
2. Create Applications environment files:
This option create an environment file that defines your system configuration.
3. Copy files to destinations:
This option copies files from each product are to central location, where they can be easily referenced
by non-Application Programs. The file types copied to the respective destinations are
JAVA file to $JAVA_TOP
HTML file to $OAH_TOP
Media files to $OAM_TOP
4: Convert Character set:
This task converts the character set of all translatable files in the APPL_TOP. You should select this
task if you want to change the base language or add additional language to Oracle Applications.
This task has a sub menu.

It scans the APPL_TOP and creates files in $APPL_TOP/admin/$TWO_TASK/out directory
admanifest_excp.lst: lists files that will not be converted because of lossy conversion admanifest.lst: lists files that can be converted.
admainfest_lossy.lst: lists files with loss conversion , including line by line details.
Review the files listed in admanifest_excp.lst. Fix the files that report lossy conversion before you
convert the character set.
5: Maintain snapshot information:
Basically there are two types of snapshots
APPL_TOP: It lists patches and version of files in the APPL_TOP.
Global snapshot: It lists patches and latest versions of files in the entire Application system. (i.e. across all APPL_TOP's)
Both APPL_TOP and global snapshots may be either
Current view snapshot: A Current view snapshot is created once and updated when appropriate to maintain a consistent view.
named view snapshots: It is a copy of the current view snapshot at a particular time (not necessarily the latest) and it is not updated.
This menu has a sub menu.

6: Check for missing files:
This option verifies all the file required to run Oracle Applications for the present configuration are there in APPL_TOP, and checks if any are missing. The information about the missing files is written in admvrf.lst file and its location is $APPL_TOP/admin$TWO_TASK/out.
3: Compiled/Reload Application Database entities:
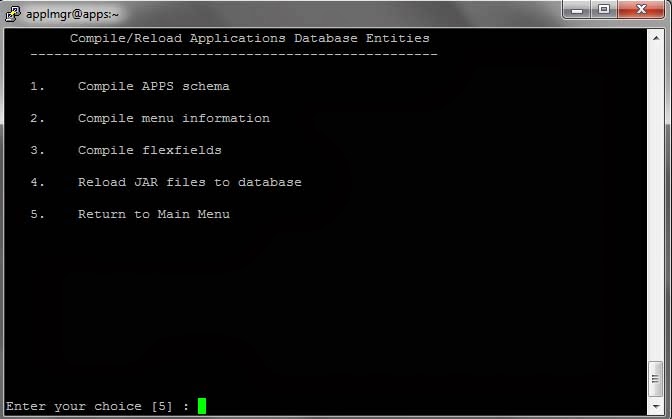
1: Compile APPS schema:
This option compiles invalid objects in the APPS schema. Invalid objects in other schema as sys and system are not necessarily compiled. You can use multiple workers for parallel processing.
2: Compile menu information:
It compiles the menu data structure. It needs to be done if compile security concurrent requests submitted from the menu form fail or if you have uploaded menu entries to the FND_MENU_ENTRIES table.
3: Compile flex fields:
It compiles flex field data structure in Applications Object Library (AOL) tables. this needs to be done if the patch application changes the setup of flex field.
4: Reload JAR files to database:
It reloads all the Oracle Application JAR files to the database, choose this option if the patch readme says so or if all Oracle Application Java classes are removed from your database.
4: Maintain Application Database Entities:

1: Validate APPS schema:
Validating APPS schema means verifying the integrity of the APPS schema. It checks whether the APPS schema has proper roles and privileges or not. This task produces a report named
<APPS schema name>.lst, which is located at $APPL_TOP/admin/$TWO_TASK/out.
2: Re-create grants and synonyms for APPS schema:
It recreates grants and synonyms for APPLSYSPUB, for APPS schema and for recreating grants on some packages from system to APPS. Each product's data objects are created in its own schema (such as AP schema) but the user accesses all data objects through the APPS schema. therefore the APPS schema must have the appropriate grants and synonyms for those objects.
3: Maintain multi-lingual tables:
This task need to be done after you add a new language. It maintains multilingual tables for Oracle Applications by adding missing, untranslated rows.
4:Check dual table:
It ensures that the dual table exists and has exactly one row. The dual table is created automatically by Oracle along with the data dictionary. This table has one column named "Dummy" of type Varchar2 and contains one row with a value of 'X'.
5: Maintain multiple reporting currencies schema:
It maintains multiple reporting currencies schema (MRC). If MRC functionality is not implements in your database, the option will read 'Convert to Multiple Reporting Currencies schema'.
6: Convert to multi-org:
This option appears as a menu choice only if multi-org is not installed in your database. Using this you can convert to multiple org architecture.
5: Changing Maintenance Mode:
This is the last option of adadmin menu. In Maintenance mode Oracle Application system is made accessible only for patching activities. This provides optimal performance for Auto Patch sessions. Maintenance mode is only needed for Auto Patch session.

To disable Maintenance mode enter 2
