Thursday, 20 July 2023

Oracle Archivelog Mode

 Oracle Database lets you save filled groups of redo log files to one or more offline destinations, known collectively as the archived redo log, or more simply the archive log. The process of turning redo log files into archived redo log files is called archiving. This process is only possible if the database is running in ARCHIVELOG mode. 

Checking Archivelog Mode:

Use below command to check the archivelog mode inside the oracle database.

SQL> archive log list;


You can also use below command.

SQL> SELECT LOG_MODE FROM SYS.V$DATABASE;


Set Archivelog Destination:

You must set a destination for archivelog files.

Create a directory for archivelog files.

$ mkdir /u01/oradata/archive

Change the parameter for archivelog destination.

SQL> alter system set log_archive_dest_1='location=/u01/oradata/archive';

Enable Archivelog Mode:

Please note that in order to enable archivelog mode, you must bounce the database

SQL> Shut immediate;
SQL> Startup mount;
SQL> alter database archivelog;
SQL> alter database open;
SQL> archive log list;
 

Archivelog mode is enabled. Run the below commands to check the archivelog mode.

 SQL> archive log list;


 SQL> SELECT LOG_MODE FROM SYS.V$DATABASE;


Performing Log Switch:

While your database is running in archivelog mode, you can perform force log switch. This will archive the current redo log file and force LGWR to start over-writing other redo log member

SQL> alter system switch logfile;


Disable Archivelog mode:

For disabling archivelog mode please run the below commands.

Please note that in order to disable archivelog mode, you must bounce the database 

SQL> shut immediate;
SQL> startup mount;
SQL> alter database noarchivelog;
SQL> alter database open;
SQL> archive log list;
 

 Thank You


Friday, 3 March 2023

Step by Step Installation ORACLE EBS 12.1.1

 Preparing the OS:

 Edit  Yum.repository  and keep ol6_latest and ol6_addon  ebabled=1

# cd /etc/yum.repos.d
# yum install wget.x86_64
# wget http://public-yum.oracle.com/public-yum-ol6.repo
# vi public-yum-ol6.repo

([ol6_latest] name=Oracle Linux $releasever Latest ($basearch)
baseurl=http://public-yum.oracle.com/repo/OracleLinux/OL6/latest/$basearch/
gpgkey=http://public-yum.oracle.com/RPM-GPG-KEY-oracle-ol6
gpgcheck=1
enabled=1

[ol6_addons] name=Oracle Linux $releasever Add ons ($basearch)
baseurl=http://public-yum.oracle.com/repo/OracleLinux/OL6/addons/$basearch/
gpgkey=http://public-yum.oracle.com/RPM-GPG-KEY-oracle-ol6
gpgcheck=1
enabled=1

[ol6_UEK_latest] name=Latest Unbreakable Enterprise Kernel for Oracle Linux $releasever ($basearch)
baseurl=http://public-yum.oracle.com/repo/OracleLinux/OL6/UEK/latest/$basearch/
gpgkey=http://public-yum.oracle.com/RPM-GPG-KEY-oracle-ol6
gpgcheck=1
enabled=1)

Esc:wq —-save and exit


* Update all the Packages

# yum clean all
# yum update
# yum install oracle-ebs-server-R12-preinstall
# yum install oracle-database-server-12cR2-preinstall.x86_64

* Move unzip and rename to 6version unzip

# mv /usr/bin/unzip /usr/bin/unzip-ver6

# ldconfig -v
reboot the server.
 
# cat /etc/selinux/config
SELINUX=enforcing
 

* Disable Iptables

# service iptables stop
# chkconfig iptables off

* Edit sysctl.conf

# vi /etc/sysctl.conf
 
net.ipv4.ip_forward = 0
net.ipv4.conf.default.rp_filter = 1
net.ipv4.conf.default.accept_source_route = 0
kernel.sysrq = 0
kernel.core_uses_pid = 1
net.ipv4.tcp_syncookies = 1
fs.aio-max-nr = 1048576
net.ipv4.tcp_tw_recycle = 0
kernel.shmall = 2097152
kernel.shmmax = 4294967295
kernel.shmmni = 4096
kernel.sem = 256 32000 100 142
fs.file-max = 131072
net.ipv4.ip_local_port_range = 10000 65000
kernel.msgmni = 2878
kernel.msgmax = 8192
kernel.msgmnb = 65535
net.core.rmem_default = 262144
net.core.wmem_default = 262144
net.core.rmem_max = 4194304
net.core.wmem_max = 262144

# sysctl -p

* Edit Network Configuration

# cat /etc/hosts

127.0.0.1       localhost       localhost.localdomain
::1             localhost       localhost.localdomain

192.168.0.18    dev.r121.com    dev

* Make the below changes in limits.conf

# vi /etc/security/limits.conf

* hard nofile 65535
* soft nofile 4096
* hard nproc 16386
* soft nproc 2047

* Create /etc/oraInst.loc file and put the below content in it

inventory_loc=/u01/oracle/oraInventory
inst_group=dba
 

* Link to motif library in Oracle Application

# unlink /usr/lib/libXtst.so.6
# ln -s /usr/X11R6/lib/libXtst.so.6.1 /usr/lib/libXtst.so.6

* Create Appropriate Users and Groups

# groupadd oinstall
# groupadd dba
# usermod -g oinstall -G dba oracle
# usermod -g oinstall -G dba applmgr

* Create directories and provide permissions

# mkdir apps
# mkdir oradata
# chown -R oracle:dba oradata/
# chmod 775 oradata/
# chown -R applmgr:dba apps
# chmod 775 apps/

EBS Installation

Go to the r12.1 stage directory 'startCD/Disk1'

# pwd
/mnt/hgfs/F/stageR12.1.1/startCD/Disk1/rapidwiz


Start the installation graphical user interface by running

# ./rapidwiz


Click Next


Select Option 1, since we are doing the installation 


Provide oracle support e-mail & password if you wish to receive security updates. Here, I don’t need of the updates, so unchecked the tick mark


Select 'Create a new configuration' and Click 'Next'


 Edit the ports, if you wish to change the default ports. Here I am going with the default ports

Provide the appropriate details like Database SID, Hostname with owner, groups of the installation directory for the database.


Provide the appropriate details like Hostname with owner, groups of the installation directory for the application


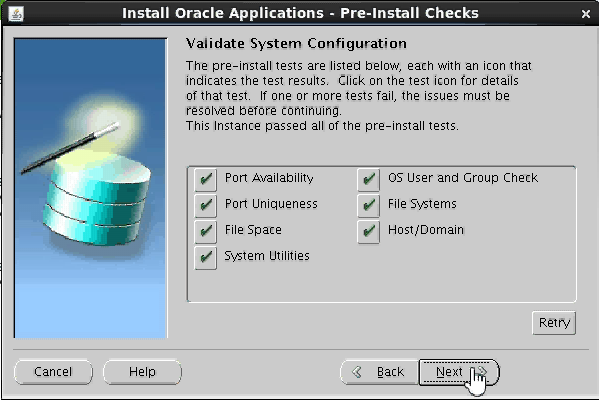
When all the pre-checks are successful, go ahead for the installation.


It will take time to complete the installation

Once, the installation is complete, post-install validation run’s automatically. If it is successful, then installation is completed, else if any of the check is errored, check the log, fix-up the issue and retry.


Click on Finish 


Verify the service.


Verify the front-end


Installation of Oracle EBS R12.1 is completed
Thank you...